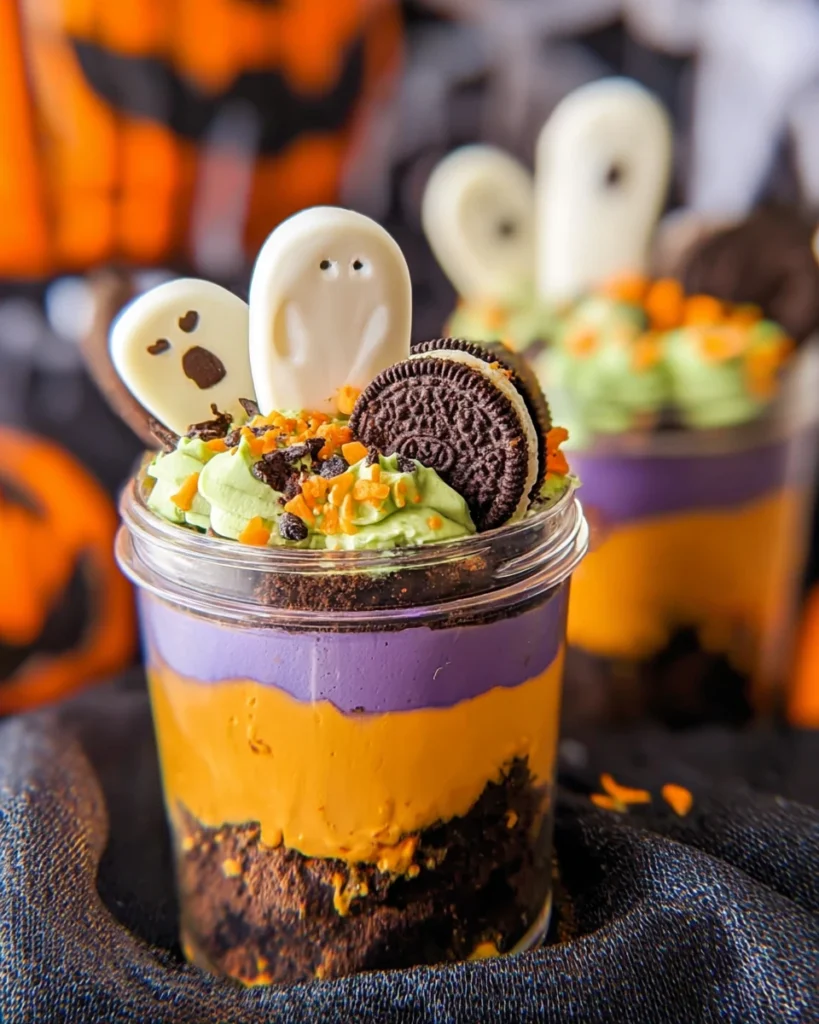
Graveyard Pudding is such a fun treat that brings a little spookiness to your kitchen. Whether you’re gearing up for Halloween or just want a whimsical dessert to impress your friends, this recipe is perfect. Picture this: creamy, rich chocolate pudding layered with crushed cookies, topped off with gummy worms and whimsical decorations that turn your dish into a graveyard scene. Kids and adults alike will love this festive dish! The best part? It’s simple to make, and the whole process can feel like a playful adventure. So grab your mixing bowls, and let’s create something delicious and delightfully eerie!
Ingredients for Graveyard Pudding
To whip up this delightful Graveyard Pudding, you’ll need a few key ingredients that come together to create layers of taste and texture. Here’s what you’ll gather:
- Chocolate pudding mix (about 3.9 oz)
- Milk (about 2 cups)
- Crushed chocolate sandwich cookies (like Oreos, approx. 2 cups)
- Gummy worms (about 1 cup)
- Whipped topping (optional, for serving)
- Chocolate sprinkles (for extra decor)
- Graveyard decorations (like edible tombstones or other spooky figures)
Having these on hand will set you up for success. The combination of the creamy pudding and the crunchy cookie layers is what makes this dessert truly enchanting.
Preparing the Chocolate Pudding
Now, let’s start making the chocolate pudding, the heart of our Graveyard Pudding. Follow these simple steps:
- Mix the pudding: In a medium bowl, combine the chocolate pudding mix with the cold milk. Use a whisk to blend well.
- Set it aside: Let it sit for about 5 minutes, allowing it to thicken nicely. You should notice the pudding becoming creamier.
This process is quick and straightforward. As the pudding thickens, its rich aroma fills the air, creating anticipation for what’s to come!

Assembling Your Graveyard Pudding
With the pudding ready, it’s time to assemble your spooky masterpiece. This part is where the fun really shines through.
- Layer the pudding: Grab a clear glass or dessert dish. Start by adding a scoop of chocolate pudding at the bottom.
- Add crushed cookies: Next, sprinkle a generous layer of crushed chocolate sandwich cookies over the pudding. This will represent the “dirt” in your graveyard.
- Repeat layers: Continue alternating layers of pudding and cookies until you reach the top of your dessert cup. Finish with a layer of crushed cookies for that perfect graveyard look.
This layering effect not only looks appealing but also allows everyone to enjoy the different textures with each spoonful.
Decorating Your Graveyard Pudding

Now, it’s time to add the finishing touches to your Graveyard Pudding. This is where you can let your creativity shine!
- Place gummy worms: Arrange gummy worms across the top of your crushed cookie layer. They can peek out as if they’re crawling through the dirt.
- Add decor: If you have edible tombstones or spooky figures, place them strategically throughout the cookie layer. You might even try using a bit of frosting to anchor them down so they don’t topple over.
- Sprinkle on chocolate sprinkles: For a little extra flair, sprinkle chocolate sprinkles across the top. This gives a more festive touch and an added depth to your creation.
Seeing your Graveyard Pudding come to life is a delightful experience!
Chilling Your Dessert
After assembling and decorating, give your Graveyard Pudding a bit of resting time in the refrigerator. Chilling is essential for the best taste and texture.
- Cover and chill: Cover your dessert with plastic wrap. Chill in the fridge for at least 1 hour before serving. This waiting period allows the flavors to meld beautifully.
It’s hard not to sneak a spoonful, but trust me, the wait will be worth it!
Serving Suggestions
Finally, it’s time to serve your Graveyard Pudding. Here are some fun ideas to make your presentation even more engaging:
- Party Style: Set out individual cups for each guest. Each person gets their own little graveyard to enjoy.
- Family Style: Or, you can serve it in one big bowl and let everyone dig in together. It’s a great communal dessert that encourages sharing.
- Garnish with whipped topping: If you want to make it extra indulgent, top each serving with a dollop of whipped topping before serving.
Group settings often make for great memories, and desserts like these always spark enthusiasm.
Tips for Success
Making Graveyard Pudding can be a breeze with just a few helpful tips:
- Use different cookie types: For an interesting twist, try mixing different flavors of sandwich cookies, like vanilla or peanut butter, along with chocolate.
- Make it ahead: If you’re planning for a gathering, you can make it a day in advance. This saves time and allows the flavors to develop even more.
- Let kids help: This recipe is super fun for kids. Let them help with layering and decorating. Their creativity will make each dessert unique!
Everyone can learn something new in the kitchen. Sharing this experience can create wonderful family traditions.
Common Questions About Graveyard Pudding
Not sure about something? Here’s a quick FAQ to clear things up:
- Can I use homemade pudding? Absolutely! If you’re up for it, homemade chocolate pudding can elevate this dessert even more.
- How long can it be stored? Graveyard Pudding can last in the refrigerator for about 3-4 days. Just ensure it’s covered well.
- Can I change the toppings? Of course! Feel free to use different candies, or even gummy spiders for an extra spooky touch.
Those little changes can make your Graveyard Pudding experience even more enjoyable and fun!

Wrapping Up
Creating this Graveyard Pudding is not just about enjoying a sweet treat; it’s about having fun and getting a bit creative. From gathering your ingredients to assembling and decorating, every step brings joy and excitement. Whether you’re celebrating Halloween or just looking for a playful dessert, this recipe is sure to be a hit. So, gather your loved ones, share some laughs, and make a fabulous Graveyard Pudding together. Happy cooking!
Print
Graveyard Pudding
Graveyard Pudding is a whimsical dessert that layers creamy chocolate pudding with crushed cookies, garnished with gummy worms, making it perfect for festive occasions.
- Total Time: 15 minutes
- Yield: Serves 8
Ingredients
- Chocolate pudding mix (about 3.9 oz)
- Milk (about 2 cups)
- Crushed chocolate sandwich cookies (like Oreos, approx. 2 cups)
- Gummy worms (about 1 cup)
- Whipped topping (optional, for serving)
- Chocolate sprinkles (for extra decor)
- Graveyard decorations (like edible tombstones or other spooky figures)
Instructions
- Mix the chocolate pudding mix with cold milk and whisk until combined.
- Let the pudding sit for about 5 minutes to thicken.
- Layer chocolate pudding in a clear glass or dessert dish.
- Sprinkle a layer of crushed cookies over the pudding.
- Repeat the layers until reaching the top, finishing with crushed cookies.
- Decorate with gummy worms, graveyard decorations, and chocolate sprinkles.
- Cover and chill in the refrigerator for at least 1 hour before serving.
Last Step:
Please leave a rating and comment letting us know how you liked this recipe! This helps our business to thrive and continue providing free, high-quality recipes for you.Notes
Consider using different flavored sandwich cookies for variety.
This dessert can be prepared a day in advance for convenience.
Invite kids to help with the layering and decoration for added fun.
- Prep Time: 15 minutes
- Cook Time: 0 minutes
- Category: Dessert
- Method: No-bake
- Cuisine: American
Nutrition
- Calories: 320
- Sugar: 25g
- Sodium: 250mg
- Fat: 15g
- Saturated Fat: 5g
- Unsaturated Fat: 7g
- Trans Fat: 0g
- Carbohydrates: 45g
- Fiber: 2g
- Protein: 4g
- Cholesterol: 30mg