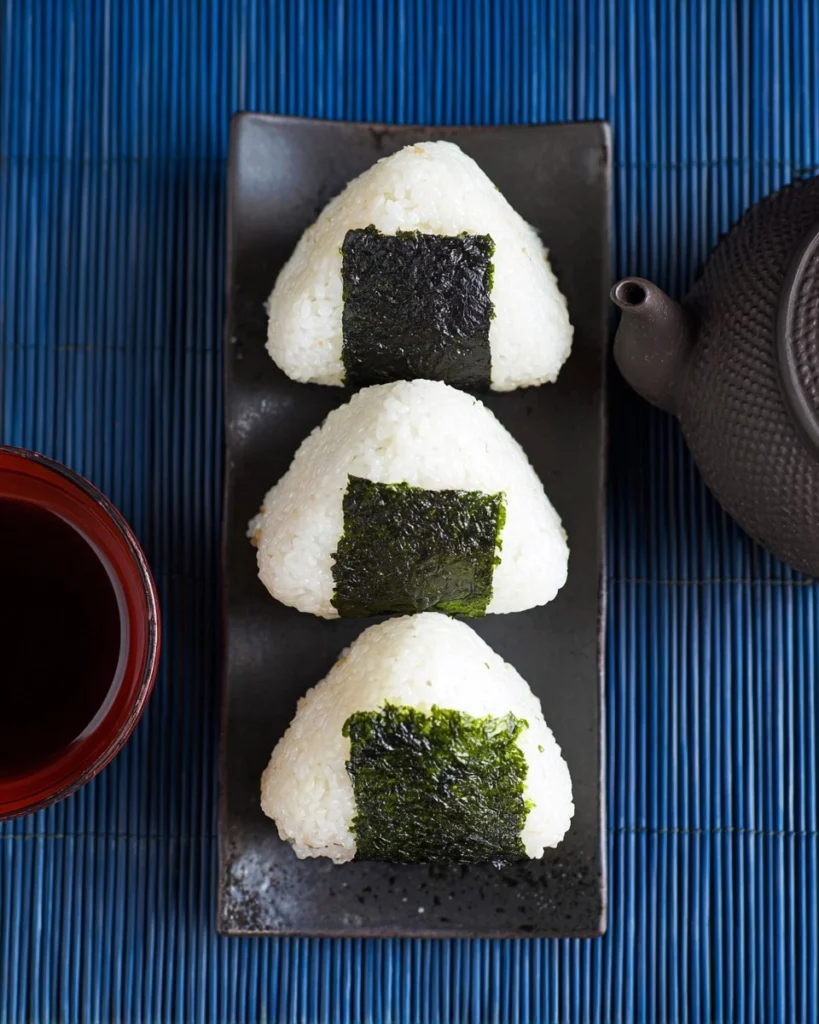
Wrap Onigiri are one of those cozy snacks that capture the essence of Japanese cuisine—simple yet bursting with flavor. These delightful rice balls, often filled with the goodness of savory ingredients, are wrapped lovingly in nori, bringing a satisfying chewiness that beckons you back for more. When you bite into one, you get that beautiful balance of tender rice and umami-packed fillings, making it an ideal snack any time of the day. Whether you’re preparing them for a lunchbox treat or a late-night crave, they never disappoint.

I first discovered how wonderfully simple it was to make Onigiri during a rainy day spent in my kitchen, experimenting with different fillings. The joy of molding the sticky rice into shapes and wrapping them neatly brought a smile to my face. Not only are these rice balls incredibly easy to whip up, but they can also be customized to suit your taste—perfect for those who prefer a hearty meal on the go. If you haven’t tried making Wrap Onigiri yet, I can assure you it’s a rewarding experience that will leave you eager to share with friends and family.
Why You’ll Love This Recipe
- Simple & Quick: Takes just 20 minutes to prepare and cook, perfect for busy days.
- Irresistible Flavor: The combination of seasoned rice and savory fillings creates a satisfying bite.
- Eye-Catching Appeal: Wrap Onigiri are as fun to look at as they are to eat, making them a hit at any gathering.
- Flexible Serving: Enjoy them as a snack, light meal, or even at a picnic—whatever you fancy!
- Diet-Friendly Options: Easily adaptable to gluten-free or vegan diets with varied fillings.
Ingredients You’ll Need
- 2 cups Japanese short-grain rice: This particular rice is sticky and holds its shape well, key for forming those lovely Onigiri. Look for brands labeled ‘sushi rice’ for best results.
- 2 sheets nori (roasted seaweed): Adds a delightful crunch and umami flavor. You can find them dried at most grocery stores; opt for high-quality brands for the best taste.
- 1 teaspoon salt: Season the rice, balancing flavors. Feel free to adjust based on dietary needs.
- Optional fillings: Consider 1 tablespoon pickled plum, 1/3 cup shredded salmon, or 1/3 cup tuna salad for various flavor profiles. Don’t hesitate to mix and match as your pantry allows!
How to Make Wrap Onigiri
-
Prepare the Rice: Rinse 2 cups of Japanese short-grain rice under cold water until the water runs clear. This removes excess starch and ensures a fluffy texture. Cook the rice in a rice cooker or on the stovetop according to package instructions. Once cooked, let it rest for about 10 minutes to cool slightly.
-
Season the Rice: While still warm, sprinkle 1 teaspoon of salt over the rice. Mix gently with a wooden spoon or spatula, being careful not to mash the grains. Let the rice cool to a manageable temperature.
-
Shape the Onigiri: With wet hands (to prevent sticking), take a handful of rice (about 1/3 to 1/2 cup) and create a ball or triangle shape. If you prefer, you can use plastic wrap to help mold your rice into perfect shapes.
-
Add the Filling: If you’re using a filling, flatten the rice in your palm, place a small amount of filling in the center, then encase it with the rice. Shape it again, ensuring the rice fully covers the filling.
-
Wrap with Nori: Take your nori sheet and cut it into strips or squares, depending on your preference. Lightly wrap the shaped Onigiri with a piece of nori to add flavor and stability. You can serve them immediately or wrap them lightly for storage.
Storing & Reheating
Store your Wrap Onigiri at room temperature for a few hours if you’re planning to eat them soon. For longer storage, place them in an airtight container and refrigerate for up to 2 days, ensuring they stay fresh. If you want to freeze them, wrap each Onigiri individually in plastic wrap and then place them in a freezer bag—up to 3 months in the freezer works well. To reheat, simply thaw them in the fridge overnight and enjoy at room temperature, or give them a brief zap in the microwave to refresh them, remembering that the texture may be slightly different after freezing.
Chef’s Helpful Tips
- To avoid soggy Onigiri, make sure your rice is slightly warm when shaping. Wet hands help mold the rice without it sticking to your fingers.
- If shaping Onigiri is new to you, practicing with plastic wrap can streamline the process and help achieve consistent shapes.
- Customize your fillings! Think outside of the box—try roasted vegetables, flavored tofu, or even leftover stir-fry.
- Using freshly toasted nori adds incredible flavor. You can quickly toast it over a low flame for a few seconds for that fresh taste.
- Keep experimenting with seasoning your rice; a splash of rice vinegar, sugar, or even sesame oil can elevate the flavor significantly.
Wrap Onigiri is not just a dish; it’s a canvas for creativity and a doorway into a world filled with delightful flavors. With a little practice, you’ll be able to whip them up in no time and impress your friends with both taste and presentation. Don’t hesitate to try various fillings and seasoning combinations—your taste buds will thank you!

Recipe FAQs
How can I make Onigiri vegan?
Absolutely! Simply swap out any fish or meat fillings with your favorite veggies or plant-based options, like avocado, seasoned tofu, or even a medley of sautéed mushrooms.
Can I use regular rice instead of short-grain?
Using regular long-grain rice can make Onigiri less sticky, which may affect how well they hold together. If you can, opt for short-grain rice, as it’s designed to form that necessary sticky texture.
What’s the best way to reheat frozen Onigiri?
To reheat frozen Onigiri, let them thaw in the refrigerator overnight, then serve at room temperature. If you prefer, you can also microwave them for about 20-30 seconds to warm them up gently without overcooking.
How long do Onigiri last?
If kept in the refrigerator in an airtight container, Onigiri can last for about 2 days. If you freeze them, they can be stored for up to 3 months, though their texture may change slightly. Enjoy making and sharing these delightful rice balls!
Print
Wrap Onigiri
Wrap Onigiri is a delightful Japanese-inspired dish made with short-grain rice and nori, featuring optional savory fillings. Perfect for quick meals or healthy snacks, it’s easy to prepare and a joy to eat!
- Total Time: 40 minutes
- Yield: Approximately 4 servings
Ingredients
- Japanese short-grain rice
- Nori sheets (roasted seaweed)
- Salt
- Optional fillings (e.g., pickled plum, salmon, tuna mayo)
Instructions
- Shape the Japanese short-grain rice into a ball or triangle using your hands or plastic wrap.
- Lightly wrap the shaped rice in nori sheets for storage or serve as is.
Last Step:
Please leave a rating and comment letting us know how you liked this recipe! This helps our business to thrive and continue providing free, high-quality recipes for you.Notes
Make sure to use short-grain rice for the best texture.
Feel free to vary the fillings based on your taste preferences.
- Prep Time: 20 minutes
- Cook Time: 20 minutes
- Category: Lunch
- Method: No Cook
- Cuisine: Japanese
Nutrition
- Serving Size: 1 onigiri
- Calories: 200
- Sugar: 0g
- Sodium: 200mg
- Fat: 3g
- Saturated Fat: 0.5g
- Unsaturated Fat: 2g
- Trans Fat: 0g
- Carbohydrates: 42g
- Fiber: 1g
- Protein: 4g
- Cholesterol: 0mg