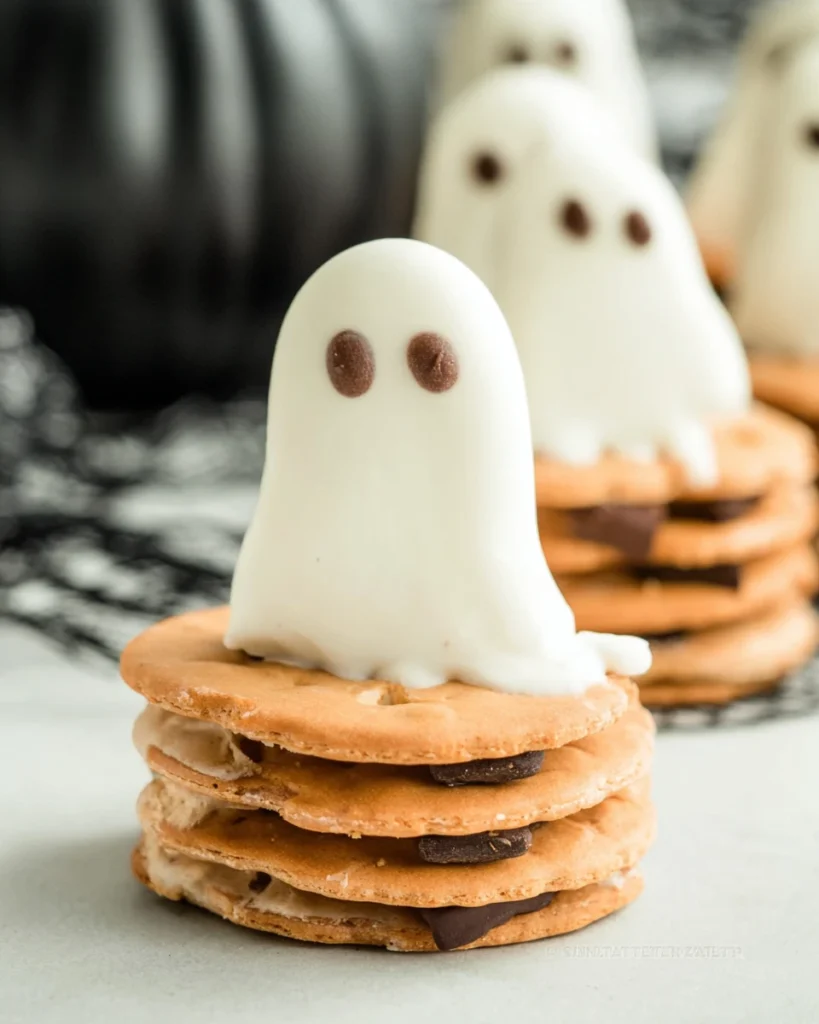
Nutter Butter Ghosts Halloween Treats bring a spooky fun twist to your Halloween celebrations! These adorable little cookies not only taste great but also add a festive touch to any gathering. Picture a platter full of cute ghostly treats, each one made with a crunchy Nutter Butter cookie, creamy white chocolate, and charming little eyes. They’re easy to make, perfect for kids and adults alike, and don’t require baking!
Just imagine gathering your friends or family and creating these fun treats together. It’s a wonderful way to bond, spark creativity, and enjoy the holiday spirit. Plus, who wouldn’t want to bite into a cute ghost that tastes as good as it looks? Whether you’re hosting a Halloween party, need a sweet treat for school, or just want to channel your inner kitchen wizard, these Nutter Butter Ghosts are perfect. Let’s get started and whip up some delightful spooky snacks that will impress everyone and make your Halloween unforgettable!
Ingredients
Now we’re getting down to the important stuff—what you’ll need to whip up these Nutter Butter Ghosts Halloween Treats. Gather the following:
- 12 Nutter Butter cookies
- 1 cup white chocolate chips
- 1 tablespoon vegetable oil
- Mini chocolate chips (for eyes)
Once you have these goodies, you’re ready to make some magic happen in the kitchen.
Step-by-Step Instructions
Let’s walk through the steps to create these ghostly delights. Follow along, and in no time, you’ll have a spooky platter ready for your Halloween event!
Step 1: Melt the White Chocolate
Start by melting the white chocolate chips. You can do this in the microwave or on a stovetop. If you’re using a microwave, place the chocolate chips in a microwave-safe bowl and heat them in 30-second intervals, stirring in between until it’s nice and smooth. If you prefer the stovetop, use a double boiler. Just be sure to keep stirring always to prevent burning.
Step 2: Add Vegetable Oil
Once the chocolate is melted and creamy, mix in the vegetable oil. This step is crucial because it helps the chocolate coat the cookies smoothly and gives them that nice glossy finish.
Step 3: Dip the Cookies
Take one Nutter Butter cookie at a time and dip it into the white chocolate mixture. Make sure it gets completely covered. Using a fork, lift the cookie out and gently tap off any excess.
Step 4: Decorate with Chocolate Chips
Lay the dipped cookie on a baking sheet lined with parchment paper. While the chocolate is still wet, place two mini chocolate chips on top for the eyes. This is where your creativity can shine! You can position the eyes however you like—at an angle for a silly ghost or straight on for a classic look.
Step 5: Let Them Set
Once all the cookies are dipped and decorated, it’s time to let them set. Pop them in the fridge for about 30 minutes. This will help the chocolate harden, ensuring that your treats look great and hold their shape.
Step 6: Serve and Enjoy
After the treats have set, they’re ready to be enjoyed! Carefully remove them from the baking sheet and arrange them on a spooky platter. You can even get creative with your presentation: add some fake spider webs or candy corn around them for a festive touch.

Tips for Success
While making these Nutter Butter Ghosts Halloween Treats is pretty straightforward, here are a few tips to help you along the way:
- Use a High-Quality Chocolate: The better the chocolate, the better the flavor. Choose high-quality white chocolate for best results.
- Watch the Temperature: If the chocolate gets too hot, it can seize up. Always melt it gently.
- Experiment with Flavors: If you want to mix it up, try adding a little extract like vanilla or almond to the melted chocolate for extra flavor.
Variations to Try

If you’re feeling adventurous, consider these fun variations on the Nutter Butter Ghosts Halloween Treats:
- Colored Chocolate: Instead of white chocolate, use colored candy melts. You can create ghosts in all sorts of colors!
- Add Sprinkles: Before the chocolate sets, sprinkle some edible glitter or colored sprinkles over the ghosts for a festive touch.
- Different Cookies: Swap Nutter Butters for other cookie types. Oreos or vanilla wafers can add a different spin to your ghosts.
Why We Love Nutter Butter Ghosts
There’s something about these Nutter Butter Ghosts that makes them irresistible. Not only are they fun to make, but they’re also a delightful addition to any Halloween gathering. The creamy peanut butter flavor mingled with sweet chocolate creates a delicious combination that keeps everyone coming back for more.
They bring smiles, laughter, and a touch of creativity to the spooky season. Kids love them not only for their tasty flavor but also for their cute appearance. Adults appreciate how quick and easy they are to prepare, leaving more time to relish the festivities.

Conclusion
Making Nutter Butter Ghosts Halloween Treats is about more than just following a recipe. It’s about creating moments that you’ll remember and enjoying the spirit of Halloween together with your family and friends. The joy of making these little ghosts is amplified when you share them with others. So grab your ingredients and get started—these treats are going to be a hit!
Celebrating Halloween becomes extra special with fun and delicious snacks like these. As you put together your spooky platter, think of all the smiles you’re about to create. Enjoy every bite!
Print
Nutter Butter Ghosts Halloween Treats
Nutter Butter Ghosts are a fun, no-bake treat combining crunchy cookies and creamy white chocolate, perfect for Halloween celebrations and family gatherings.
- Total Time: 15 minutes
- Yield: 12 treats 1x
Ingredients
- 12 Nutter Butter cookies
- 1 cup white chocolate chips
- 1 tablespoon vegetable oil
- Mini chocolate chips (for eyes)
Instructions
- Melt white chocolate chips in the microwave or stovetop.
- Mix in vegetable oil for a smooth coating.
- Dip each Nutter Butter cookie in the chocolate mixture.
- Place dipped cookies on parchment paper and add mini chocolate chips for eyes.
- Refrigerate for about 30 minutes to harden.
- Serve and enjoy on a festive platter.
Last Step:
Please leave a rating and comment letting us know how you liked this recipe! This helps our business to thrive and continue providing free, high-quality recipes for you.Notes
Use high-quality white chocolate for the best flavor.
Melt chocolate gently to avoid seizing up.
Consider adding flavor extracts for a unique twist.
- Prep Time: 15 minutes
- Cook Time: 0 minutes
- Category: Dessert
- Method: No-Bake
- Cuisine: American
Nutrition
- Calories: 150
- Sugar: 9
- Sodium: 50
- Fat: 8
- Saturated Fat: 4
- Unsaturated Fat: 2
- Trans Fat: 0
- Carbohydrates: 18
- Fiber: 1
- Protein: 2
- Cholesterol: 0