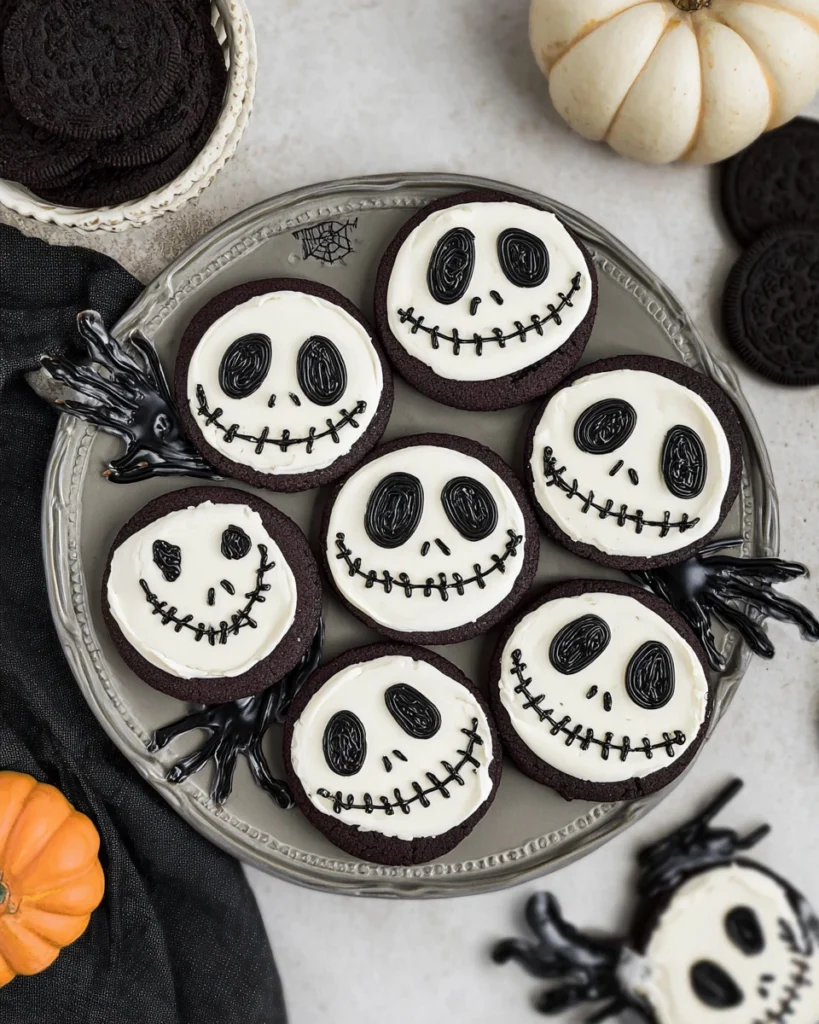
Jack Skellington Cookies are the perfect treat for any fan of Tim Burton’s classic film “The Nightmare Before Christmas.” The iconic pumpkin king deserves some recognition, especially when it comes to desserts! Making these cookies can be a delightful journey filled with festive spirit. You can gather your friends or family, put on some spooky tunes, and transform your kitchen into a whimsical baking haven. The beauty of these cookies lies not only in their appearance but also in their simple but flavorful ingredients. Every bite brings the playful essence of Halloween and Christmas together, and topped with delightful icing, they turn into little works of art. Let’s roll up our sleeves and whip up some Jack Skellington Cookies that will impress everyone who tries them.
Ingredients
To make your Jack Skellington Cookies, gather the following ingredients:
For the Cookies:
- 2 ½ cups all-purpose flour
- 1 teaspoon baking powder
- ½ teaspoon salt
- 1 cup unsalted butter, softened
- 1 cup granulated sugar
- 1 egg
- 1 teaspoon vanilla extract
For the Icing:
- 2 cups powdered sugar
- 2 tablespoons milk (add more for desired consistency)
- Food coloring (black and orange)
- Piping bags (or a resealable plastic bag)
Instructions
Now that we have our ingredients ready, let’s get started with the fun part—baking!
Step 1: Prepping the Dough
Begin by preheating your oven to 350°F (175°C). This ensures your cookies will bake evenly. While the oven heats, grab a mixing bowl for your dry ingredients. Sift together the flour, baking powder, and salt. This step adds air and makes your cookies light.
In another bowl, cream together the softened butter and granulated sugar until fluffy. It may take a few minutes, but this is essential for a soft cookie texture. Next, beat in the egg and the vanilla extract, mixing until fully combined. Now, combine the wet and dry mixtures until a dough forms. Shape it into a disk, wrap it in plastic wrap, and refrigerate for at least an hour. Chilling the dough helps prevent spreading during baking.
Step 2: Rolling and Cutting Out the Shapes
Once chilled, remove the dough from the fridge. On a floured surface, roll out the dough to about ¼ inch thick. This thickness ensures that your cookies hold their shape but still remain soft. Grab your favorite cookie cutter shaped like Jack Skellington’s head.
Carefully cut out the cookies and place them on a parchment-lined baking sheet, leaving a little space between each one. If you want to create a spooky scene, you might choose to add different shapes, like bats or pumpkins. The variety adds to the fun!
Step 3: Baking the Cookies
With your cookies ready, pop them in the preheated oven for about 10-12 minutes. Keep an eye on them! They should turn a light golden color but not brown. Once done, take them out and let them cool on a wire rack. This cooling time is essential for the next step—decorating!
Step 4: Making the Royal Icing
While your cookies cool, let’s prepare the icing. In a mixing bowl, combine the powdered sugar and milk. Stir until smooth. You want a consistency that can flow but remains thick enough to hold its shape on the cookies. If it’s too thick, slowly add more milk.
Now comes the exciting part: coloring! Divide the icing into two bowls. Use black food coloring in one to achieve that classic Jack Skellington look. Leave the other one white for the base color. If you’re feeling adventurous, you can add some orange icing for Halloween vibes.
Step 5: Decorating the Cookies
Once the cookies are cool, it’s time to decorate. Using your piping bags or a plastic bag with the corner snipped off, outline the cookies in black icing to create Jack’s signature spooky grin and eyes. This defining detail adds personality and charm.
Let the black icing dry slightly before filling in the spaces with the white icing. This layering approach gives your cookies a standout appearance. You can even take it a step further by adding cute little stitches around the mouth with the black icing.
Step 6: Finishing Touches
After decorating, let the cookies sit until the icing sets. This may take about 30 minutes to an hour, depending on the thickness of your icing. If you want to add any decoration like edible glitter, now’s your chance! It gives your cookies an enchanting sheen that brightens up the festive feel.
Step 7: Packaging or Enjoying
Once the icing is firm, your Jack Skellington Cookies are ready for enjoyment! You can package them in cute boxes or tins if you plan to give them away as gifts. Or simply place them on a festive plate and enjoy them with friends or family.
Conclusion
Creating Jack Skellington Cookies is not just about baking; it’s about celebrating creativity and fun in the kitchen. These cookies are perfect for any Halloween or holiday gathering, bringing smiles and a bit of spooky charm to each bite. So gather your ingredients, invite some friends, and enjoy the delightful process of bringing Jack Skellington to life with cookies! Happy baking!
Print
Jack Skellington Cookies
These playful cookies combine the spirit of Halloween and Christmas with their fun design and flavorful ingredients. Perfect for celebrations or gatherings!
- Total Time: 32 minutes
- Yield: 24 cookies 1x
Ingredients
- 2 ½ cups all-purpose flour
- 1 teaspoon baking powder
- ½ teaspoon salt
- 1 cup unsalted butter, softened
- 1 cup granulated sugar
- 1 egg
- 1 teaspoon vanilla extract
- 2 cups powdered sugar
- 2 tablespoons milk (add more for desired consistency)
- Food coloring (black and orange)
- Piping bags (or a resealable plastic bag)
Instructions
- Preheat oven to 350°F (175°C).
- Sift together flour, baking powder, and salt.
- Cream butter and sugar until fluffy, then mix in egg and vanilla.
- Combine wet and dry ingredients to form dough, wrap, and refrigerate for at least an hour.
- Roll out the dough to ¼ inch thick and cut into cookie shapes.
- Bake for 10-12 minutes until light golden, then cool on a wire rack.
- Mix powdered sugar and milk for icing, color with food dye.
- Decorate cookies with black and white icing.
- Let icing set before serving or gifting.
Last Step:
Please leave a rating and comment letting us know how you liked this recipe! This helps our business to thrive and continue providing free, high-quality recipes for you.Notes
Chilling the dough helps prevent spreading.
Feel free to add other shapes like bats or pumpkins for variety.
Let the icing sit for 30 minutes to an hour to set properly.
- Prep Time: 20 minutes
- Cook Time: 12 minutes
- Category: Dessert
- Method: Baking
- Cuisine: American
Nutrition
- Calories: 150
- Sugar: 10
- Sodium: 100
- Fat: 6
- Saturated Fat: 3
- Unsaturated Fat: 2
- Trans Fat: 0
- Carbohydrates: 22
- Fiber: 0
- Protein: 1
- Cholesterol: 15