Creating a Halloween Pop Tart Haunted House is such a fun way to celebrate the season! Picture this: cute little Pop Tart ghosts, spooky icing designs, and more candy than you can count. It’s the perfect activity to get the whole family involved, whether you’re a baking pro or just looking for some festive fun. This recipe is not just about enjoying delicious treats but also about sparking creativity in the kitchen. With Halloween right around the corner, why not channel your inner artist and craft a haunted house that tastes as good as it looks? Trust me, you’ll be the hit of any Halloween gathering! So grab your baking supplies, turn on your favorite Halloween playlist, and let’s get into the spooky spirit with our Halloween Pop Tart Haunted House!
Ingredients
To build your Halloween Pop Tart Haunted House, gather the following ingredients:
- 1 box of Pop Tarts (flavors of your choice)
- Icing (store-bought or homemade)
- Assorted candies (think gummies, chocolate, and licorice)
- Food coloring (for decorating)
- Sprinkles or edible glitter (to add some sparkle!)
- Cookie sticks or pretzel rods (for structural support)
- Cardboard or a cake board (as the base)
Tools You’ll Need
Before you start constructing your haunted masterpiece, make sure you have these tools handy:
- Piping bags (or zip-top bags with a corner snipped)
- Scissors
- Spatula or knife (for spreading icing)
- A plate or tray (to display your house)

Making the Base
Now that you have all your ingredients and tools ready, let’s create the base for our Halloween Pop Tart Haunted House.
-
Choose Your Base: Use cardboard or a cake board. This will hold your house together and give it stability. You can cut it into any size you want, but a square or rectangular shape works best.
-
Prepare the Pop Tarts: Take the Pop Tarts and carefully remove them from the packaging. Decide how many you’ll need for the walls and roof of your haunted house. Typically, you’ll need four for the walls and two for the roof.
-
Secure Your Walls: Begin by standing two Pop Tarts upright on the base for the front and back walls, then attach the sides using icing. You can use a generous amount to ensure they stick well. Don’t worry if your icing gets a bit messy—it’ll add to the spooky charm!
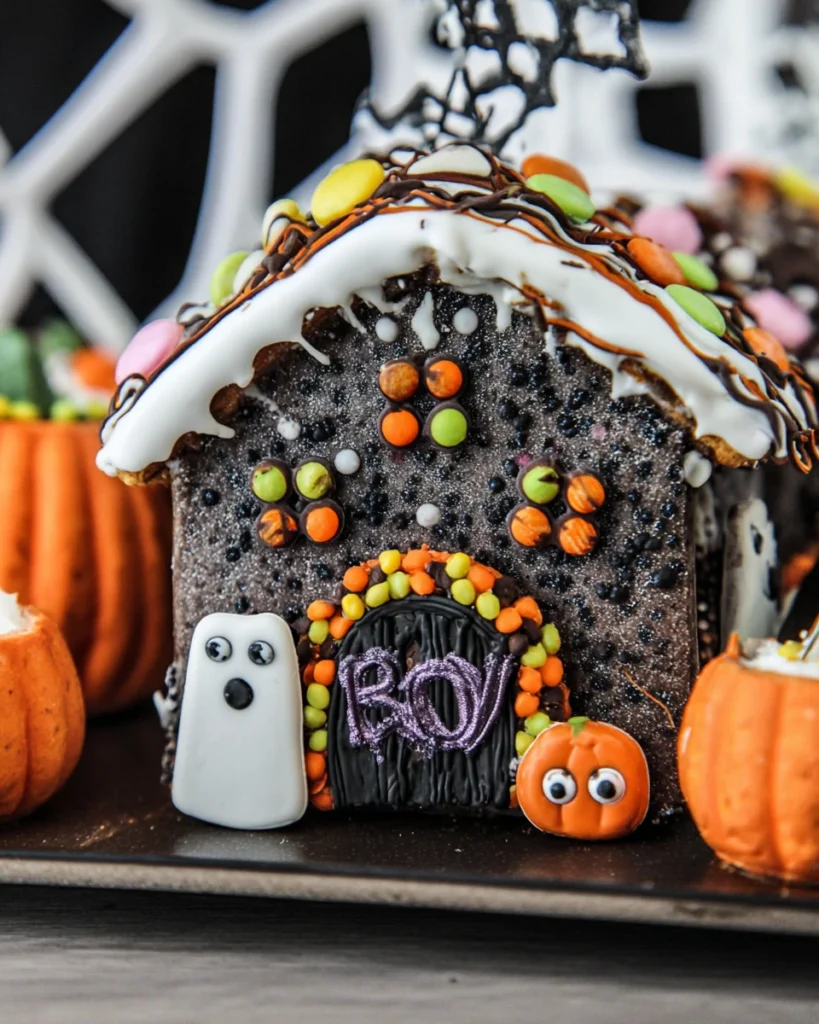
Decorating the Haunted House

Once the walls are up, it’s time to bring your Halloween Pop Tart Haunted House to life with decorations:
-
Add the Roof: Place two more Pop Tarts on top to form the roof. Trim them slightly if needed to create a snug fit.
-
Get Creative with Icing: Use your icing to create spooky designs. You can pipe out ghosts, cobwebs, or even little bats. Remember to have fun with it—there’s no right or wrong way!
-
Candy Time: Now comes the best part—decorating with candy! Use assorted candies to create windows, doors, and any other fun details. Seriously, the more colorful, the better. You can make candy surrounds for windows or a licorice doorframe.
-
Finish with Sprinkles: To add some final touches, sprinkle edible glitter or sprinkles on the icing. This will give your haunted house a magical sparkle that everyone will love.
Creating Halloween Characters
To complement your haunted house, let’s whip up some spooky, sweet Halloween characters! It’s super easy and will make your display even more festive.
-
Make Ghosts Using Pop Tarts: Take additional Pop Tarts and cut them into ghost shapes. Use icing to add eyes and a mouth.
-
Create Pumpkin Friends: Use round candies or cookies as pumpkins. Use icing to draw faces on them or add green candy for leaves.
-
Spider Treats: Get some chocolate-covered pretzels for spiders. Add little candy eyes to make them look alive.
-
Witch Hat Cookies: If you have chocolate cookies, place a Hershey’s Kiss on top and use icing to “glue” it all together.
Setting Up Your Halloween Display
As Halloween approaches, now you get to arrange everything for display!
-
Choose a Spooky Spot: Find a place in your kitchen or dining area that will be seen by guests. A good spot by the front door can also greet trick-or-treaters with festive charm.
-
Arrange Your Haunted House: Place your Pop Tart Haunted House on a serving platter. This not only holds your house securely but also makes it look extra special.
-
Create a Scene: Surround your house with all the fun characters you made. Position the ghosts, pumpkins, and spiders for a charming little Halloween scene. Add some fake cobwebs or mini pumpkins for extra flair.
Enjoying Your Treat
Once your Halloween Pop Tart Haunted House is set up, it’s time for the best part—digging in!
-
Gather Friends and Family: Encourage everyone to admire your spooky creation. Let them take photos for memories.
-
Get Tasting: After all the admiring, it’s time to enjoy! Cut a slice of the house, or take off a ghost, and savor the sweet flavors of your creation. Don’t forget to have some milk or hot cider on hand!
-
Share Your Creation: If you’re feeling generous, pack up some pieces to share with friends or neighbors. This sweet gesture is perfect for the Halloween spirit!

Tips for Success
To make your experience even better, here are some quick tips:
- Prep in Advance: If you’re short on time, you can prepare the base and decorations a day earlier.
- Use Seasonal Candies: Take advantage of seasonal candies available during Halloween for a unique twist.
- Have Fun: The most important tip is to have fun while you’re making your Halloween Pop Tart Haunted House!
Creating a Halloween Pop Tart Haunted House is such an enjoyable and festive activity. You get to combine creativity, cooking, and Halloween spirit all in one delightful project! Whether you are celebrating with family or friends, this haunted house will surely create lasting memories. Plus, it’s a tasty treat to enjoy long after the decorations are up. So grab your crafting materials and get started—I’m sure you’ll create a masterpiece that brings smiles and deliciousness to many! Happy Halloween!
Print
Halloween Pop Tart Haunted House
This Halloween Pop Tart Haunted House is a delightful way to celebrate the season, combining creativity and deliciousness. Perfect for family fun!
- Total Time: 45 minutes
- Yield: 1 haunted house 1x
Ingredients
- 1 box of Pop Tarts (flavors of your choice)
- Icing (store-bought or homemade)
- Assorted candies (think gummies, chocolate, and licorice)
- Food coloring (for decorating)
- Sprinkles or edible glitter (to add some sparkle!)
- Cookie sticks or pretzel rods (for structural support)
- Cardboard or a cake board (as the base)
Instructions
- Choose a base using cardboard or a cake board.
- Prepare the Pop Tarts for walls and the roof.
- Secure the walls by standing two Pop Tarts upright and attaching sides with icing.
- Add the roof using two additional Pop Tarts.
- Decorate with icing, candies, and final touches with sprinkles.
Last Step:
Please leave a rating and comment letting us know how you liked this recipe! This helps our business to thrive and continue providing free, high-quality recipes for you.Notes
Prep the base and decorations a day in advance if short on time.
Utilize seasonal candies for decoration.
Enjoy the process and have fun creating!
- Prep Time: 30 minutes
- Cook Time: 15 minutes
- Category: Dessert
- Method: No-bake
- Cuisine: American
Nutrition
- Calories: 200
- Sugar: 20
- Sodium: 150
- Fat: 5
- Saturated Fat: 2
- Unsaturated Fat: 3
- Trans Fat: 0
- Carbohydrates: 38
- Fiber: 1
- Protein: 2
- Cholesterol: 0