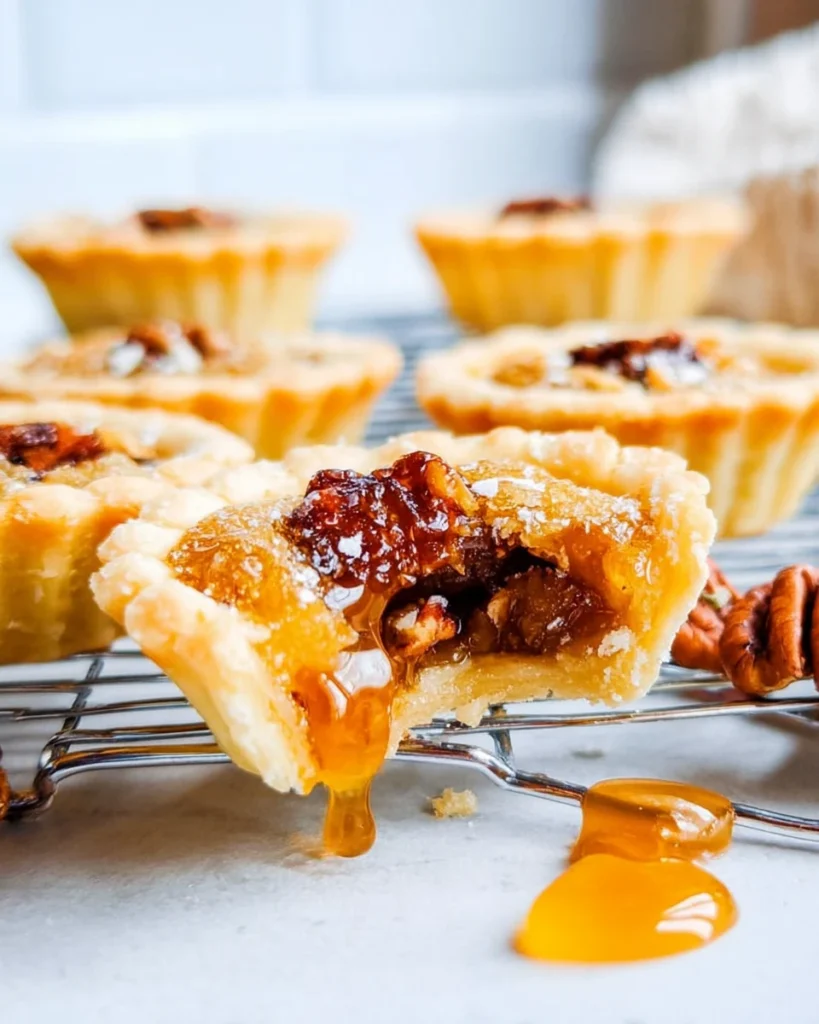
Canadian Butter Tarts are a classic Canadian delight that offer a perfect balance of sweetness and creaminess. These tarts feature a flaky crust filled with a combination of rich, buttery goodness and a golden, gooey filling. Imagine biting into a warm tart, the sweet, syrupy center oozing into your mouth while the buttery crust crumbles delightfully. Yum! Whether you grew up enjoying them or are trying them for the first time, Canadian butter tarts are sure to impress. They remind you of simple pleasures and cozy gatherings. Plus, the recipe is flexible, allowing you to dress them up with your favorite nuts or dried fruits. Get ready to experience the deliciousness and dive into the world of this beloved Canadian treat!
Why This Recipe Works
The secret behind these delicious Canadian butter tarts lies in the blend of ingredients. The use of light brown sugar combined with corn syrup creates a perfectly balanced sweetness that complements the buttery flavor beautifully. Chilling the pastry dough is essential. It ensures a flaky, tender texture that makes each bite irresistible. Also, paying attention to the baking time is crucial; it guarantees that the filling sets perfectly without overflowing. Trust me, following these steps will lead you to buttery goodness every time!
Why You’ll Love This Canadian Butter Tarts
These tarts not only provide a nostalgic taste of Canadian tradition but also deliver an unforgettable mouthwatering experience. Just one bite will take you back to the warmth of home, and you’ll find yourself wanting more. Another reason you’ll love these butter tarts is their customization. You can easily add your favorite nuts or dried fruits. Whether you prefer pecans or walnuts, or maybe a splash of raisins, there’s no limit to how you can make these tarts your own.

Ingredients
For the Pastry
- 2 ½ cups all-purpose flour
- ¾ cup salted butter, cold and cubed
- ¼ cup cold shortening, cubed
- 1 tablespoon light brown sugar, packed
- 1 teaspoon salt
- 1 tablespoon apple cider vinegar
- Ice water, as needed
For the Filling
- ⅔ cup light brown sugar, packed
- ⅓ cup light corn syrup
- 1 large egg
- 1 egg yolk
- ½ teaspoon salt
- 1 ½ teaspoons vanilla extract
- ⅓ cup melted salted butter
- ¼ cup golden raisins
- ¼ cup chopped pecans
Preparing the Pastry Dough

Combine Dry Ingredients
Begin by grabbing a large mixing bowl and combine the flour, light brown sugar, and salt. This is where your tart journey starts.
Cut in Butter and Shortening
Next, add the cold, cubed butter and shortening to the dry mixture. Use a pastry cutter, forks, or even your fingers to mix. You want to break it down until it resembles pea-sized crumbs. This step is vital for that lovely flaky texture.
Incorporate Wet Ingredients
Then, mix in the apple cider vinegar. Now, add the ice water, one tablespoon at a time. Keep mixing until the dough starts to come together. Don’t rush this process; the right consistency is key.
Chill the Dough
Once your dough is ready, wrap it in plastic wrap and chill it in the refrigerator for at least 15 minutes. This allows the flavors to meld and ensures that your pastry stays nice and flaky.
Making the Filling
Mix Ingredients
While your dough chills, take a separate bowl and combine the light brown sugar, light corn syrup, egg, egg yolk, salt, and vanilla extract. Mix everything until it’s well combined. You should see the sugar dissolve nicely.
Add Melted Butter
Next, stir in the melted butter. This adds richness and flavor to your filling. Set it aside for when you’re ready to assemble.
Assembling the Tarts
Roll Out Dough
When the dough is chilled, take it out and roll it out on a clean surface. Aim for about a ¼-inch thickness. This is where the fun really begins!
Cut Dough Circles
Using a round cookie cutter, cut out circles about ½ to 1 inch larger than the openings of your mini tart or muffin pan. This size will ensure that each shell holds the anticipated filling.
Form Tart Shells
Gently press each dough round into the tart cavities. Make sure the sides of each tart shell are well-covered, ensuring all that delicious filling stays inside.
Add Fillings
Now it’s time for the fun part! Sprinkle a few golden raisins and chopped pecans into each pastry shell. After that, fill each shell about ¾ full with the prepared filling. But remember, don’t overfill them; you need room for bubbling.
Baking the Tarts
Preheat Oven
Preheat your oven to 400 degrees F. You want a hot oven that helps achieve that perfect golden-brown caramelization.
Bake Until Golden
Place the filled tart pan on the lower rack of your preheated oven and bake for about 15 minutes. Keep an eye on them; you’re looking for caramelized tops and lightly golden edges. Allow the tarts to cool completely before removing them from the pan. Patience is vital—trust me!
Serving Suggestions
You can serve your Canadian butter tarts warm or at room temperature. For an added touch of indulgence, go ahead and add some whipped cream or a scoop of vanilla ice cream. It transforms a lovely dessert into a heavenly experience!
Tips for Success
- Always make sure your butter and shortening are cold. This step is crucial for achieving a flaky pastry.
- Don’t forget! Leave some space for the filling when you fill your tarts. That bubbling goodness needs room to work its magic.
Variations
If you want to mix things up, consider substituting pecans with walnuts or almonds. It offers a deliciously different nutty flavor. You can also add a hint of chocolate chips to satisfy any sweet tooth in the group!
Pairing Ideas
Pair your Canadian butter tarts with a warm cup of tea or coffee. The combination is a perfect match for the sweet and rich flavors of the tarts. Trust me, once you try it, you’ll want it every time!

FAQs
1. Can I use gluten-free flour for this recipe?
Yes, you can substitute all-purpose flour with a gluten-free baking blend. However, the final results might vary.
2. How should I store the leftover tarts?
Keep any leftovers in an airtight container at room temperature for up to 3 days. You can also refrigerate them for up to a week.
3. Can I freeze these butter tarts?
Absolutely! You can freeze unbaked tarts by preparing the dough and filling, wrapping them in plastic, and placing them in the freezer. Bake them straight from frozen; just add a few extra minutes to the baking time.
4. What other fillings can I use?
Feel free to experiment with different fillings! Chocolate ganache, maple syrup, or even fruit preserves could make for an exciting new twist.
5. How can I tell when the tarts are done baking?
Look for a golden-brown crust and caramelized filling. These indicators usually mean the tarts are fully baked and ready to enjoy.
Experience the delightful taste of Canadian butter tarts that embody a sweet, gooey center and a flaky, buttery crust. This recipe not only honors a cherished Canadian dessert but also allows for personal touches through various filling options and serving ideas. Perfect for gatherings or simply enjoying as a treat at home, these butter tarts are a true comfort food that will warm your heart and satisfy your sweet cravings.
Print
Canadian Butter Tarts
Canadian Butter Tarts are a delightful treat with a gooey, sweet filling and a flaky crust. They’re perfect for cozy gatherings or a simple indulgence at home.
- Total Time: 45 minutes
- Yield: 12 tarts 1x
Ingredients
- 2 ½ cups all-purpose flour
- ¾ cup salted butter, cold and cubed
- ¼ cup cold shortening, cubed
- 1 tablespoon light brown sugar, packed
- 1 teaspoon salt
- 1 tablespoon apple cider vinegar
- Ice water, as needed
- ⅔ cup light brown sugar, packed
- ⅓ cup light corn syrup
- 1 large egg
- 1 egg yolk
- ½ teaspoon salt
- 1 ½ teaspoons vanilla extract
- ⅓ cup melted salted butter
- ¼ cup golden raisins
- ¼ cup chopped pecans
Instructions
- Combine flour, brown sugar, and salt in a bowl.
- Cut in butter and shortening until crumbly.
- Mix in apple cider vinegar and ice water until dough forms.
- Chill the dough for at least 15 minutes.
- Mix filling ingredients until well combined.
- Roll out chilled dough and cut into circles.
- Press rounds into tart pan cavities.
- Add raisins and pecans, then fill with prepared filling.
- Preheat oven to 400°F and bake tarts for about 15 minutes.
- Cool before removing from the pan.
Last Step:
Please leave a rating and comment letting us know how you liked this recipe! This helps our business to thrive and continue providing free, high-quality recipes for you.Notes
Ensure butter and shortening are cold for the best texture.
Leave space for filling to prevent overflow during baking.
Use gluten-free flour as a substitute for all-purpose flour.
- Prep Time: 30 minutes
- Cook Time: 15 minutes
- Category: Dessert
- Method: Baking
- Cuisine: Canadian
Nutrition
- Calories: 200
- Sugar: 18g
- Sodium: 150mg
- Fat: 10g
- Saturated Fat: 6g
- Unsaturated Fat: 3g
- Trans Fat: 0g
- Carbohydrates: 28g
- Fiber: 1g
- Protein: 2g
- Cholesterol: 40mg