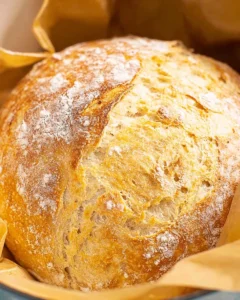
No Knead Dutch Oven Bread is the kind of bread that invites cozy evenings and family gatherings. With its crusty exterior and airy, soft interior, there’s nothing quite like pulling a fresh loaf from the oven and feeling the warmth seep into your hands. This homemade bread is your solution to store-bought options, delivering freshness and flavor that you can’t find in pre-packaged loaves. Plus, it’s simple enough to make, even for those who may feel intimidated by bread-making.

What’s wonderful about this No Knead Dutch Oven Bread is the minimal effort it requires. Just mix a few basic ingredients, and with a little patience, you’ll have a golden-brown masterpiece that makes your kitchen smell delightful. It’s perfect for dipping into soups, slathering with butter, or simply enjoying with a bit of olive oil. So, roll up your sleeves and get ready to savor the tasty rewards of home-baked goodness!
Why You’ll Love This Recipe
- Simple & Quick: Just 10 minutes of hands-on time while the dough does its magic with rising.
- Irresistible Flavor: Each bite combines a crunchy crust with a soft, chewy inside that you won’t be able to resist.
- Eye-Catching Appeal: The artisanal look of a rustic loaf will impress your guests and family alike.
- Flexible Serving: Perfect for any occasion—whether it’s a comforting family dinner or a casual get-together with friends.
- Budget-Friendly: With just a handful of pantry staples, making fresh bread at home is easier on the wallet than buying a fancy loaf!
Ingredients You’ll Need
- 3 ½ cups all-purpose flour: This forms the base of your bread, creating a lovely structure. If you want a lighter loaf, you can substitute some with bread flour.
- 2 ¼ teaspoons active dry yeast: This ingredient gives your bread its rise. Make sure to check the expiration date for best results.
- ½ teaspoon sugar (optional): Adding sugar helps feed the yeast, giving your bread more flavor and a delightful crust.
- 1 ½ teaspoons salt: Essential for flavor, it also strengthens the dough structure.
- 1 ¼ cup warm water (around 100 degrees F): Warm water activates the yeast. Using a meat thermometer helps ensure the correct temperature for optimal yeast action.
How to Make No Knead Dutch Oven Bread
- Activate the Yeast: In a medium bowl, mix together 2 ¼ teaspoons of active dry yeast with ½ teaspoon sugar and 1 ½ teaspoons salt. Pour in 1 ¼ cups of warm water and whisk until fully dissolved.
- Foam It Up: If you added sugar, let this mixture sit for 5-10 minutes until it’s foamy. If you’re skipping the sugar, just move on to the next step without waiting.
- Mix the Dough: Incorporate 3 ½ cups of all-purpose flour into the yeast mixture. Stir until everything comes together into a sticky dough. If your dough feels too dry, add 1 tablespoon of water at a time until it holds together. If too sticky, sprinkle in a little extra flour.
- Let It Rise: Cover the bowl with foil or a kitchen towel and place it in a warm spot. Allow it to rest and rise for about 2-3 hours until it doubles in size.
- Preheat the Oven: Adjust your oven racks and place a Dutch Oven (with lid) on the lowest rack, preheating your oven to 450 degrees F. Leave it to heat for about 15-20 minutes after reaching temperature.
- Shape the Dough: Gently scrape the sticky dough onto a 15”x15” piece of parchment paper. Sprinkle a little flour on top, then use the parchment to shape the dough without direct contact on the sides.
- Optional Scoring: Use a sharp knife to make a slit or design on top of the dough for a decorative touch before baking. This will help with oven spring.
- Bake the Bread: Carefully remove the lid from the preheated Dutch Oven and lift the parchment with the dough into the pot. Place the lid back on and bake for 20 minutes. After that time, remove the lid and bake for an additional 5-10 minutes until the crust is a deep golden brown and enticingly fragrant.
- Cool and Enjoy: Take the Dutch Oven out of the oven, gently lifting the bread using the parchment paper. Transfer it to a wire rack and let it cool for at least 20 minutes before slicing into your glorious loaf.
Storing & Reheating
For the best storage, keep your No Knead Dutch Oven Bread in a paper bag at room temperature for up to 3 days. If you want to keep it longer, wrap it in plastic wrap or aluminum foil and refrigerate it for up to a week. For freezing, slice the bread and wrap each slice tightly in plastic wrap, then store in a freezer-safe bag for up to 3 months. When reheating, pop it in a preheated oven at 350 degrees F for about 10 minutes to revitalize the crust.
Chef’s Helpful Tips
- Make sure your yeast is fresh and active to avoid dense bread; check its expiration date.
- If the dough looks too sticky at the beginning, don’t be tempted to add too much extra flour—wet dough leads to a chewier bread.
- Use room temperature water as instructed since this helps the dough rise effectively.
- Experiment with herbs or spices in the dough for added flavor—dried rosemary or garlic powder work beautifully!
- Keep an eye on the crust in the last moments of baking, as oven temperatures can vary.
This No Knead Dutch Oven Bread may be simple to make, but the results are anything but ordinary. Each loaf is a symphony of flavors and textures that can elevate any meal. Don’t hesitate to get creative with your ingredients and methods; the beauty of homemade bread lies in the joy of experimentation. So go ahead, embrace the process, and enjoy every delicious slice!

Recipe FAQs
Can I use whole wheat flour instead of all-purpose flour?
Yes, you can use whole wheat flour, but keep in mind that it may alter the texture and flavor slightly, making the bread denser. If using whole wheat flour, consider experimenting with a mix of all-purpose flour for best results.
What should I do if my dough doesn’t rise?
If your dough isn’t rising, it could be due to inactive yeast. Ensure your yeast is fresh and activate it properly with warm water. Sometimes, environmental factors like temperature can also affect the rising time; find a warmer spot in your home for better results.
Can I make this bread without a Dutch Oven?
Absolutely! If you don’t have a Dutch Oven, use a heavy oven-safe pot or a baking stone. For best results, cover it during the initial baking phase with a metal lid or aluminum foil to trap heat and moisture, mimicking the Dutch Oven.
How can I ensure the bread has a crispy crust?
For a crispy crust, add a small baking dish with water at the bottom of your oven during baking to create steam. Also, don’t skip the preheating process for your Dutch Oven; it’s crucial for achieving that golden crust.
Print
No Knead Dutch Oven Bread
This No Knead Dutch Oven Bread is a delightful blend of flavors with a crispy crust and soft interior. With just a few ingredients and simple steps, you can enjoy a warm, freshly baked loaf that’s perfect for any meal or occasion.
- Total Time: 2 hours 50 minutes
- Yield: 1 loaf 1x
Ingredients
- 3 ½ cups all-purpose flour
- 2 ¼ teaspoons active dry yeast
- ½ teaspoon sugar (optional)
- 1 ½ teaspoons salt
- 1 ¼ cup warm water (about 100 degrees)
Instructions
- In a medium bowl, combine the yeast, sugar, and salt.
- Pour in the warm water and whisk until fully dissolved.
- If using sugar, let the mixture sit for 5-10 minutes until foamy, confirming the yeast is active. If not using sugar, skip this step.
- Incorporate the flour and mix until a sticky dough forms. Adjust with more water or flour as necessary to achieve the right consistency.
- Cover the bowl with foil, plastic wrap, or a kitchen towel and let the dough rise in a warm area for 2-3 hours.
- Preheat the oven to 450 degrees, placing the Dutch Oven (with lid) on the lowest rack.
- After reaching 450 degrees, allow an additional 15-20 minutes for the Dutch Oven to heat thoroughly.
- Transfer the sticky dough onto a 15”x15” piece of parchment paper.
- Dust the dough with flour and shape it as desired. Optionally, score the top with a knife for decoration.
- Once preheated, carefully place the parchment with the dough into the hot Dutch Oven, cover with the lid, and bake for 20 minutes.
- Remove the lid and bake for an additional 5-10 minutes until the crust turns golden brown.
- Take the loaf out using the edges of the parchment paper and let it cool on a wire rack for 20 minutes before slicing.
Last Step:
Please leave a rating and comment letting us know how you liked this recipe! This helps our business to thrive and continue providing free, high-quality recipes for you.Notes
Use a meat thermometer to ensure the water is at the right temperature for activating the yeast.
Let the bread cool completely before slicing to maintain the texture.
Store any leftovers in an airtight container at room temperature.
- Prep Time: 10 minutes
- Cook Time: 160 minutes
- Category: Bread
- Method: Baking
- Cuisine: American
Nutrition
- Serving Size: 1 slice
- Calories: 120
- Sugar: 0g
- Sodium: 200mg
- Fat: 0.5g
- Saturated Fat: 0.1g
- Unsaturated Fat: 0.4g
- Trans Fat: 0g
- Carbohydrates: 24g
- Fiber: 1g
- Protein: 4g
- Cholesterol: 0mg