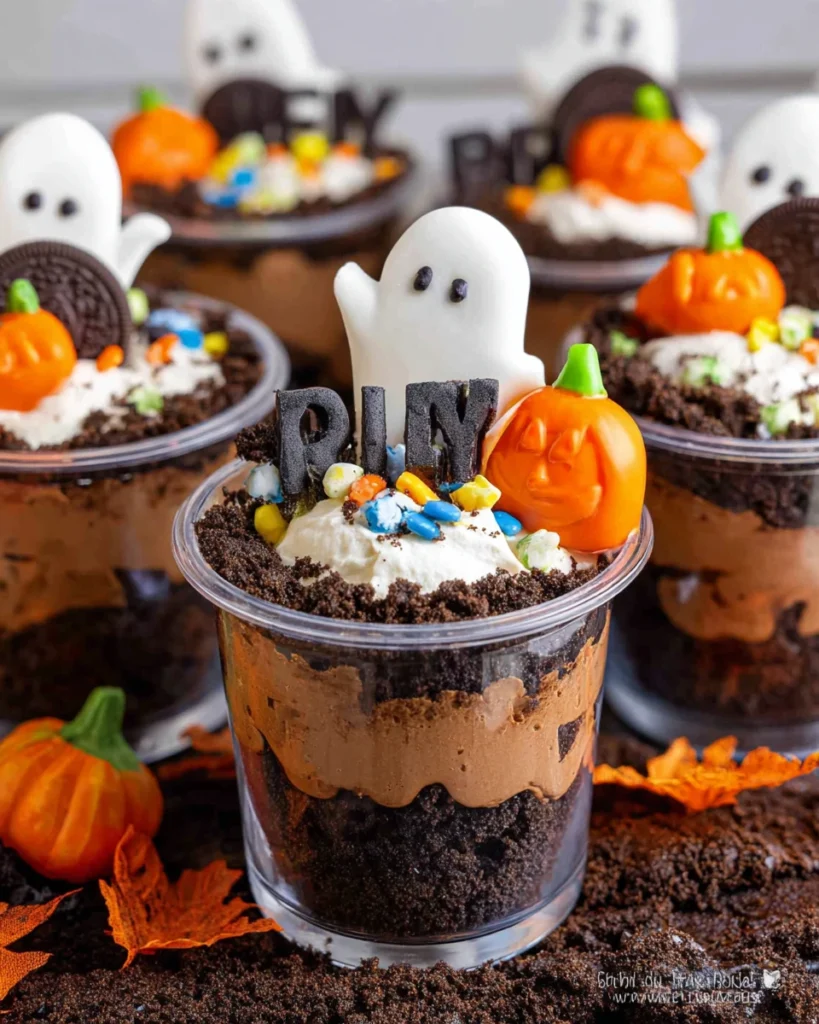
Halloween is the perfect time to get creative in the kitchen, and what better way to do that than with some fun Halloween Dirt Cups? These delightful treats are not only a feast for the eyes, but they also bring back childhood memories of making spooky snacks with friends and family. They’re simple to whip up, and you can involve the kids for a fun, hands-on experience. It’s all about layering deliciousness—think chocolate pudding, crushed cookies, and some ghoulish gummy worms. As you create these layered masterpieces, the excitement in the air is palpable! Plus, they make for a great conversation starter at any Halloween gathering. Today, I’m going to share how to make these festive Dirt Cups so you can impress your friends and family with your spooky culinary skills. So, grab your mixing bowls and let’s get started on a treat that’s sure to leave everyone wanting more!
Ingredients for Halloween Dirt Cups
Let’s kick things off by gathering all the ingredients you’ll need. Planning is key here, and without the right ingredients, even the best of intentions can be thwarted. You probably already have many of these items in your pantry and fridge.
Basic Ingredients
- Chocolate Pudding: 2 boxes (3.9 ounces each)
- Milk: 4 cups (to prepare pudding)
- Oreos: 2 packages (15.25 ounces) or another chocolate cookie of your choice
- Gummy worms: A bag, for that spooky touch
- Whipped cream: Optional, for the layers on top
- Plastic cups: 6 to 8 clear cups for serving (they look great layered)
Additional Decorations
If you’re feeling extra creative, you might want to add some crafting accessories:
- Candy corn: For a festive pop of color
- Sprinkles: Halloween-themed ones work great
Collecting everything before you start can make the process much smoother. Now that we have our ingredients lined up, we can jump right into the fun part!
Making the Chocolate Pudding
Before we get to the layers, let’s prepare the star of the show: the chocolate pudding. This step is super easy and will set the base for our Dirt Cups.
- Combine the Ingredients: In a medium saucepan, whisk together the pudding mixes and the milk.
- Heat and Stir: Place it over medium heat. Stir constantly until the mixture begins to thicken and bubble.
- Cool the Pudding: Once thickened, remove it from heat. Transfer the pudding into a bowl and cover it with plastic wrap. This will prevent a skin from forming as it cools.
It should take around 5–10 minutes for the pudding to reach that perfect consistency. While it cools, you can move on to crushing the cookies while the anticipation builds for these tasty snacks!

Crushing the Cookies
Now it’s time for a bit of a messy but fun step! Crushing Oreos or any chocolate cookies you’ve decided to use is where things start to get really fun.
- Put Cookies in a Bag: Grab a zip-top bag and add the Oreo cookies. Seal it tightly.
- Crush Away: Use a rolling pin or your hands to crush the cookies into fine crumbs. Think of it as stress relief—what’s better than smashing cookies?
Now you have your “dirt” ready for layering. Just imagine how adorable these cups will look when assembled!
Assembling the Halloween Dirt Cups

This is the moment we’ve all been waiting for! It’s time to layer the pudding and cookie crumbs to create our spooktacular Halloween Dirt Cups.
Layering Instructions
- Start with Pudding: Take your clear cup and add a generous layer of chocolate pudding at the bottom.
- Add Cookie Crumbs: Next, sprinkle a layer of your crushed Oreos over the pudding.
- Repeat the Layers: Add another layer of pudding followed by another layer of cookie crumbs. Continue until you reach the top of your cup, finishing with cookie crumbs so it looks like the dirt is fresh.
- Top it Off: If you want, add a dollop of whipped cream on top to resemble creepy spider webs.
- Decorate with Gummies: Now place some gummy worms on the top for that creepy crawly effect!
Arranging these layers can be a treat for both the eyes and the taste buds. Plus, the kids will have a blast helping with this part!
Optional Decorations and Variations
If you want to take your Halloween Dirt Cups to the next level, think about incorporating some additional decorations.
Ideas for Fun Variations
- Pumpkin Spice: Add pumpkin spice to the pudding for a seasonal twist.
- Different Toppings: You could use chocolate sprinkles or candy eyeballs for a frightful look.
- Variety of Cups: Try using different sizes of cups, or even mini jars for an adorable table setting.
When it comes to Halloween treats, the only limit is your imagination. Feel free to experiment and let your creativity shine!
Serving and Enjoying Your Halloween Dirt Cups
Once assembled, it’s time to present your spooky creations.
- Chill Before Serving: For a little while in the fridge, which lets the flavors meld together.
- Serve at Parties: These cups are perfect for Halloween parties or as a fun dessert for your family.
- Get Creative with Presentation: Place them on a spooky tray, or use Halloween-themed napkins for décor.
The excitement on your friends’ faces when they see these mini desserts will be priceless. Watching them dig in and enjoy the messiness of it all will surely add to the fun.
Tips for Cleanup
Halloween is all about fun, but someone still has to clean up! Here are a few tips to make your post-Halloween Dirt Cups party a breeze:
- Use Plastic Utensils: This makes for quicker cleanup.
- Line Surfaces with Paper: A tablecloth can help keep the mess contained.
- Get Everyone to Help: Encourage guests to pitch in, making it a team effort.
Storytime: My Halloween Dirt Cup Experience
I’ll never forget the first time I tried making Halloween Dirt Cups. I was so excited about the idea, but when I started layering the pudding and cookies, I ended up making a delicious mess! The kids were giggling, and it quickly turned into a friendly competition on who could create the funniest design. Seeing their eyes light up when they saw the final result made every bit of cleanup worth it. It’s moments like these that truly capture the spirit of Halloween, and I hope your experience will be just as special.

Final Thoughts
Making Halloween Dirt Cups is an entertaining and delicious way to celebrate the spooky season. By layering creamy chocolate pudding with crunchy cookie crumbs and topping it off with gummy worms, you create a treat that’s both tasty and visually appealing. It’s perfect for gatherings or just a fun night at home with the kids. So why not gather your ingredients and create some magic in your kitchen? With a little creativity and some simple steps, you’ll soon have a delightful dessert that’s sure to become a Halloween tradition!
Print
Halloween Dirt Cups
These Halloween Dirt Cups are a delightful treat that combines creamy chocolate pudding, crunchy cookie crumbs, and gummy worms. They’re easy to make and perfect for all ages, making them a fun addition to any Halloween celebration.
- Total Time: 25 minutes
- Yield: 6 to 8 servings
Ingredients
- Chocolate Pudding: 2 boxes (3.9 ounces each)
- Milk: 4 cups (to prepare pudding)
- Oreos: 2 packages (15.25 ounces) or another chocolate cookie of your choice
- Gummy worms: A bag, for that spooky touch
- Whipped cream: Optional, for the layers on top
- Plastic cups: 6 to 8 clear cups for serving
Instructions
- Combine pudding mixes and milk in a saucepan and whisk until smooth.
- Heat the mixture over medium, stirring constantly until it thickens.
- Remove from heat, transfer to a bowl, and cover to cool.
- Crush Oreos in a zip-top bag until fine crumbs are formed.
- Layer pudding and cookie crumbs in clear cups, finishing with cookie crumbs.
- Top with whipped cream and place gummy worms for decoration.
Last Step:
Please leave a rating and comment letting us know how you liked this recipe! This helps our business to thrive and continue providing free, high-quality recipes for you.Notes
Try adding pumpkin spice to the pudding for a seasonal twist.
Use Halloween-themed sprinkles or candy for extra decoration.
Consider chilling the cups before serving for enhanced flavor.
- Prep Time: 15 minutes
- Cook Time: 10 minutes
- Category: Dessert
- Method: No-Bake
- Cuisine: American
Nutrition
- Calories: 250
- Sugar: 20
- Sodium: 180
- Fat: 12
- Saturated Fat: 5
- Unsaturated Fat: 3
- Trans Fat: 0
- Carbohydrates: 35
- Fiber: 2
- Protein: 4
- Cholesterol: 15