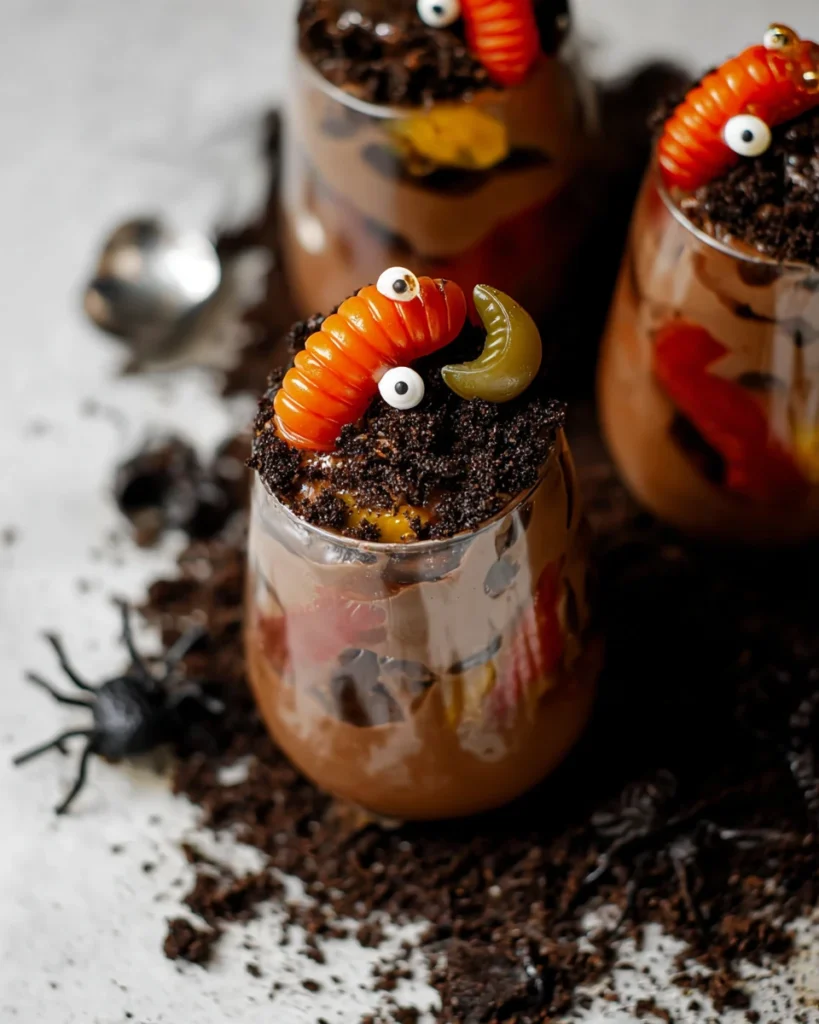
Halloween is just around the corner, and what better way to celebrate than with a fun and spooky dessert? Halloween Dirt Pudding is a whimsical treat that not only looks great but tastes absolutely delicious, too! Imagine creamy chocolate pudding layered with crunchy crushed cookies, all topped with gummy worms or cute little candy pumpkins. Perfect for kids and adults alike, this nostalgic dish brings back memories of childhood parties and festive gatherings. Plus, it’s incredibly easy to make, making it a great choice for those busy Halloween days. So grab your ingredients, gather the kids, and let’s get started on creating this frightfully delightful dessert!
Ingredients
Creating the perfect Halloween Dirt Pudding begins with simple ingredients. You likely have many on hand already, which makes this recipe even easier. Here’s what you’ll need:
- 2 cups of chocolate pudding (instant is fine)
- 1 3/4 cups of milk
- 1 cup of whipped topping (like Cool Whip)
- 1 package (about 15 ounces) of Oreo cookies
- Gummy worms (or any candy of your choice for decoration)
- Small plastic or paper cups (for serving)
- Optional: candy pumpkins, spider candies, or any cute Halloween-themed treats
Instructions
Now that you have your ingredients ready, let’s get into how to make this tasty Halloween Dirt Pudding. Follow these steps, and you’ll be on your way to a spooky good time!
Step 1: Prepare the Pudding
Start by whisking the chocolate pudding mix together with the milk. It’s best to follow the instructions on the box, usually blending for about 2 minutes until it thickens. Once you’ve whisked it to perfection, let it sit for a few minutes. This allows the pudding to set nicely.
Step 2: Crush the Oreos
While your pudding is setting, it’s time to get a little messy! Take your Oreo cookies and crush them. Placing them in a zip-top bag and using a rolling pin works well for this; it’s a bit of fun, too. You want the cookie pieces to resemble dirt, so aim for a mix of fine crumbs and small chunks.
Step 3: Mix Pudding and Whipped Topping
Once the pudding is nicely set, grab your bowl and fold in the whipped topping gently. This creates a fluffy, creamy texture that balances out the crunchiness of your cookies. You’ll want a good mix, but be careful not to over-stir—it should remain light and airy!
Step 4: Layer the Ingredients
Your next step is to form layers in the cups. Start by spooning a layer of chocolate pudding into each cup, followed by a layer of the crushed Oreo cookies. Repeat this process until you reach the top of the cups. Don’t forget to save a little bit of crushed cookies for the final touch!
Step 5: Decorate with Toppings
Now comes the most exciting part—decorating your Halloween Dirt Pudding! Sprinkle the remaining crushed Oreos on top. This adds to the ‘dirt’ effect. Finish it off with gummy worms poking out, or arrange some candy pumpkins and spider candies for that festive touch. The way you decorate can turn an already fun dessert into an eye-catching centerpiece!
Step 6: Chill and Serve
Once your cups are beautifully decorated, place them in the refrigerator for at least an hour. This chilling time helps the pudding flavors meld and gives guests a chance to be wowed by your spooky creation. After an hour, your Halloween Dirt Pudding is ready to enjoy!

Tips for Making Halloween Dirt Pudding
Creating the ultimate Halloween Dirt Pudding can be a breeze if you keep a few tips in mind:
-
Get Creative with Layers: Feel free to mix in some other treats or decorations. Perhaps seasoned graham cracker crumbs for texture or different candy toppings for variety.
-
Use Clear Cups: Using clear cups lets everyone see those delectable layers, making your dessert even more attractive.
-
Personalize Each Cup: Allow guests to customize their cups with various toppings, making it interactive and fun.
Variations to Try

While the classic Halloween Dirt Pudding is great, trying different flavors and ingredients can be just as exciting. Here are a few variations to consider:
Pumpkin Spice Dirt Pudding
Swap the chocolate pudding for pumpkin spice pudding. Layer with crushed graham crackers instead of Oreos, and top with Halloween candy corn!
Vanilla Ghost Pudding
Make a vanilla pudding version where you add a splash of almond extract. Use crushed vanilla wafers for a lighter ‘dirt’ look and decorate with marshmallow ghosts.
Chocolate Mousse Version
For a richer dessert, use chocolate mousse instead of pudding. Layer with brownie bits instead of cookies for an indulgent twist!
Serving Suggestions
Halloween Dirt Pudding can be served at various occasions beyond Halloween parties. Consider these suggestions for serving your pudding:
- Halloween Parties: A must-have for any festive gathering!
- School Events: This treat is perfect for class parties or bake sales.
- Family Gatherings: Bring a bit of fun to family dinners or holiday get-togethers.
- Movie Nights: It makes a delightful and fun dessert option for family movie nights!

Conclusion
So, there you have it! Halloween Dirt Pudding is not just a treat; it’s an experience—one that’s perfect for creating cherished memories. With its delightful layers and creative toppings, it brings out the child in everyone. Whether you keep it classic or experiment with variations, this dessert guarantees smiles all around. So grab those ingredients, invite your friends or family, and enjoy a festive cooking adventure this Halloween! Happy haunting and even happier eating!
Print
Halloween Dirt Pudding
Halloween Dirt Pudding is an easy and fun dessert that layers creamy chocolate pudding with crunchy Oreo cookies, perfect for any festive gathering!
- Total Time: 0 hours
- Yield: Serves 4-6 1x
Ingredients
- 2 cups of chocolate pudding (instant is fine)
- 1 3/4 cups of milk
- 1 cup of whipped topping (like Cool Whip)
- 1 package (about 15 ounces) of Oreo cookies
- Gummy worms (or any candy of your choice for decoration)
- Small plastic or paper cups (for serving)
- Optional: candy pumpkins, spider candies, or any cute Halloween-themed treats
Instructions
- Whisk chocolate pudding mix with milk according to package instructions and let sit to thicken.
- Crush Oreo cookies in a zip-top bag until resembling dirt.
- Fold whipped topping into the pudding until well mixed, maintaining a light texture.
- Layer chocolate pudding and crushed Oreos in cups until filled.
- Decorate with remaining crushed Oreos, gummy worms, and candy toppings.
- Chill in the refrigerator for at least an hour before serving.
Last Step:
Please leave a rating and comment letting us know how you liked this recipe! This helps our business to thrive and continue providing free, high-quality recipes for you.Notes
Get creative with additional toppings for a personalized touch.
Using clear cups enhances the visual appeal of the layers.
Allow guests to customize their dessert cups for an interactive experience.
- Prep Time: 15 minutes
- Cook Time: No cooking required
- Category: Dessert
- Method: No-bake
- Cuisine: American
Nutrition
- Calories: 320
- Sugar: 20
- Sodium: 250
- Fat: 12
- Saturated Fat: 5
- Unsaturated Fat: 2
- Trans Fat: 0
- Carbohydrates: 45
- Fiber: 3
- Protein: 4
- Cholesterol: 15